Kulisa user guide
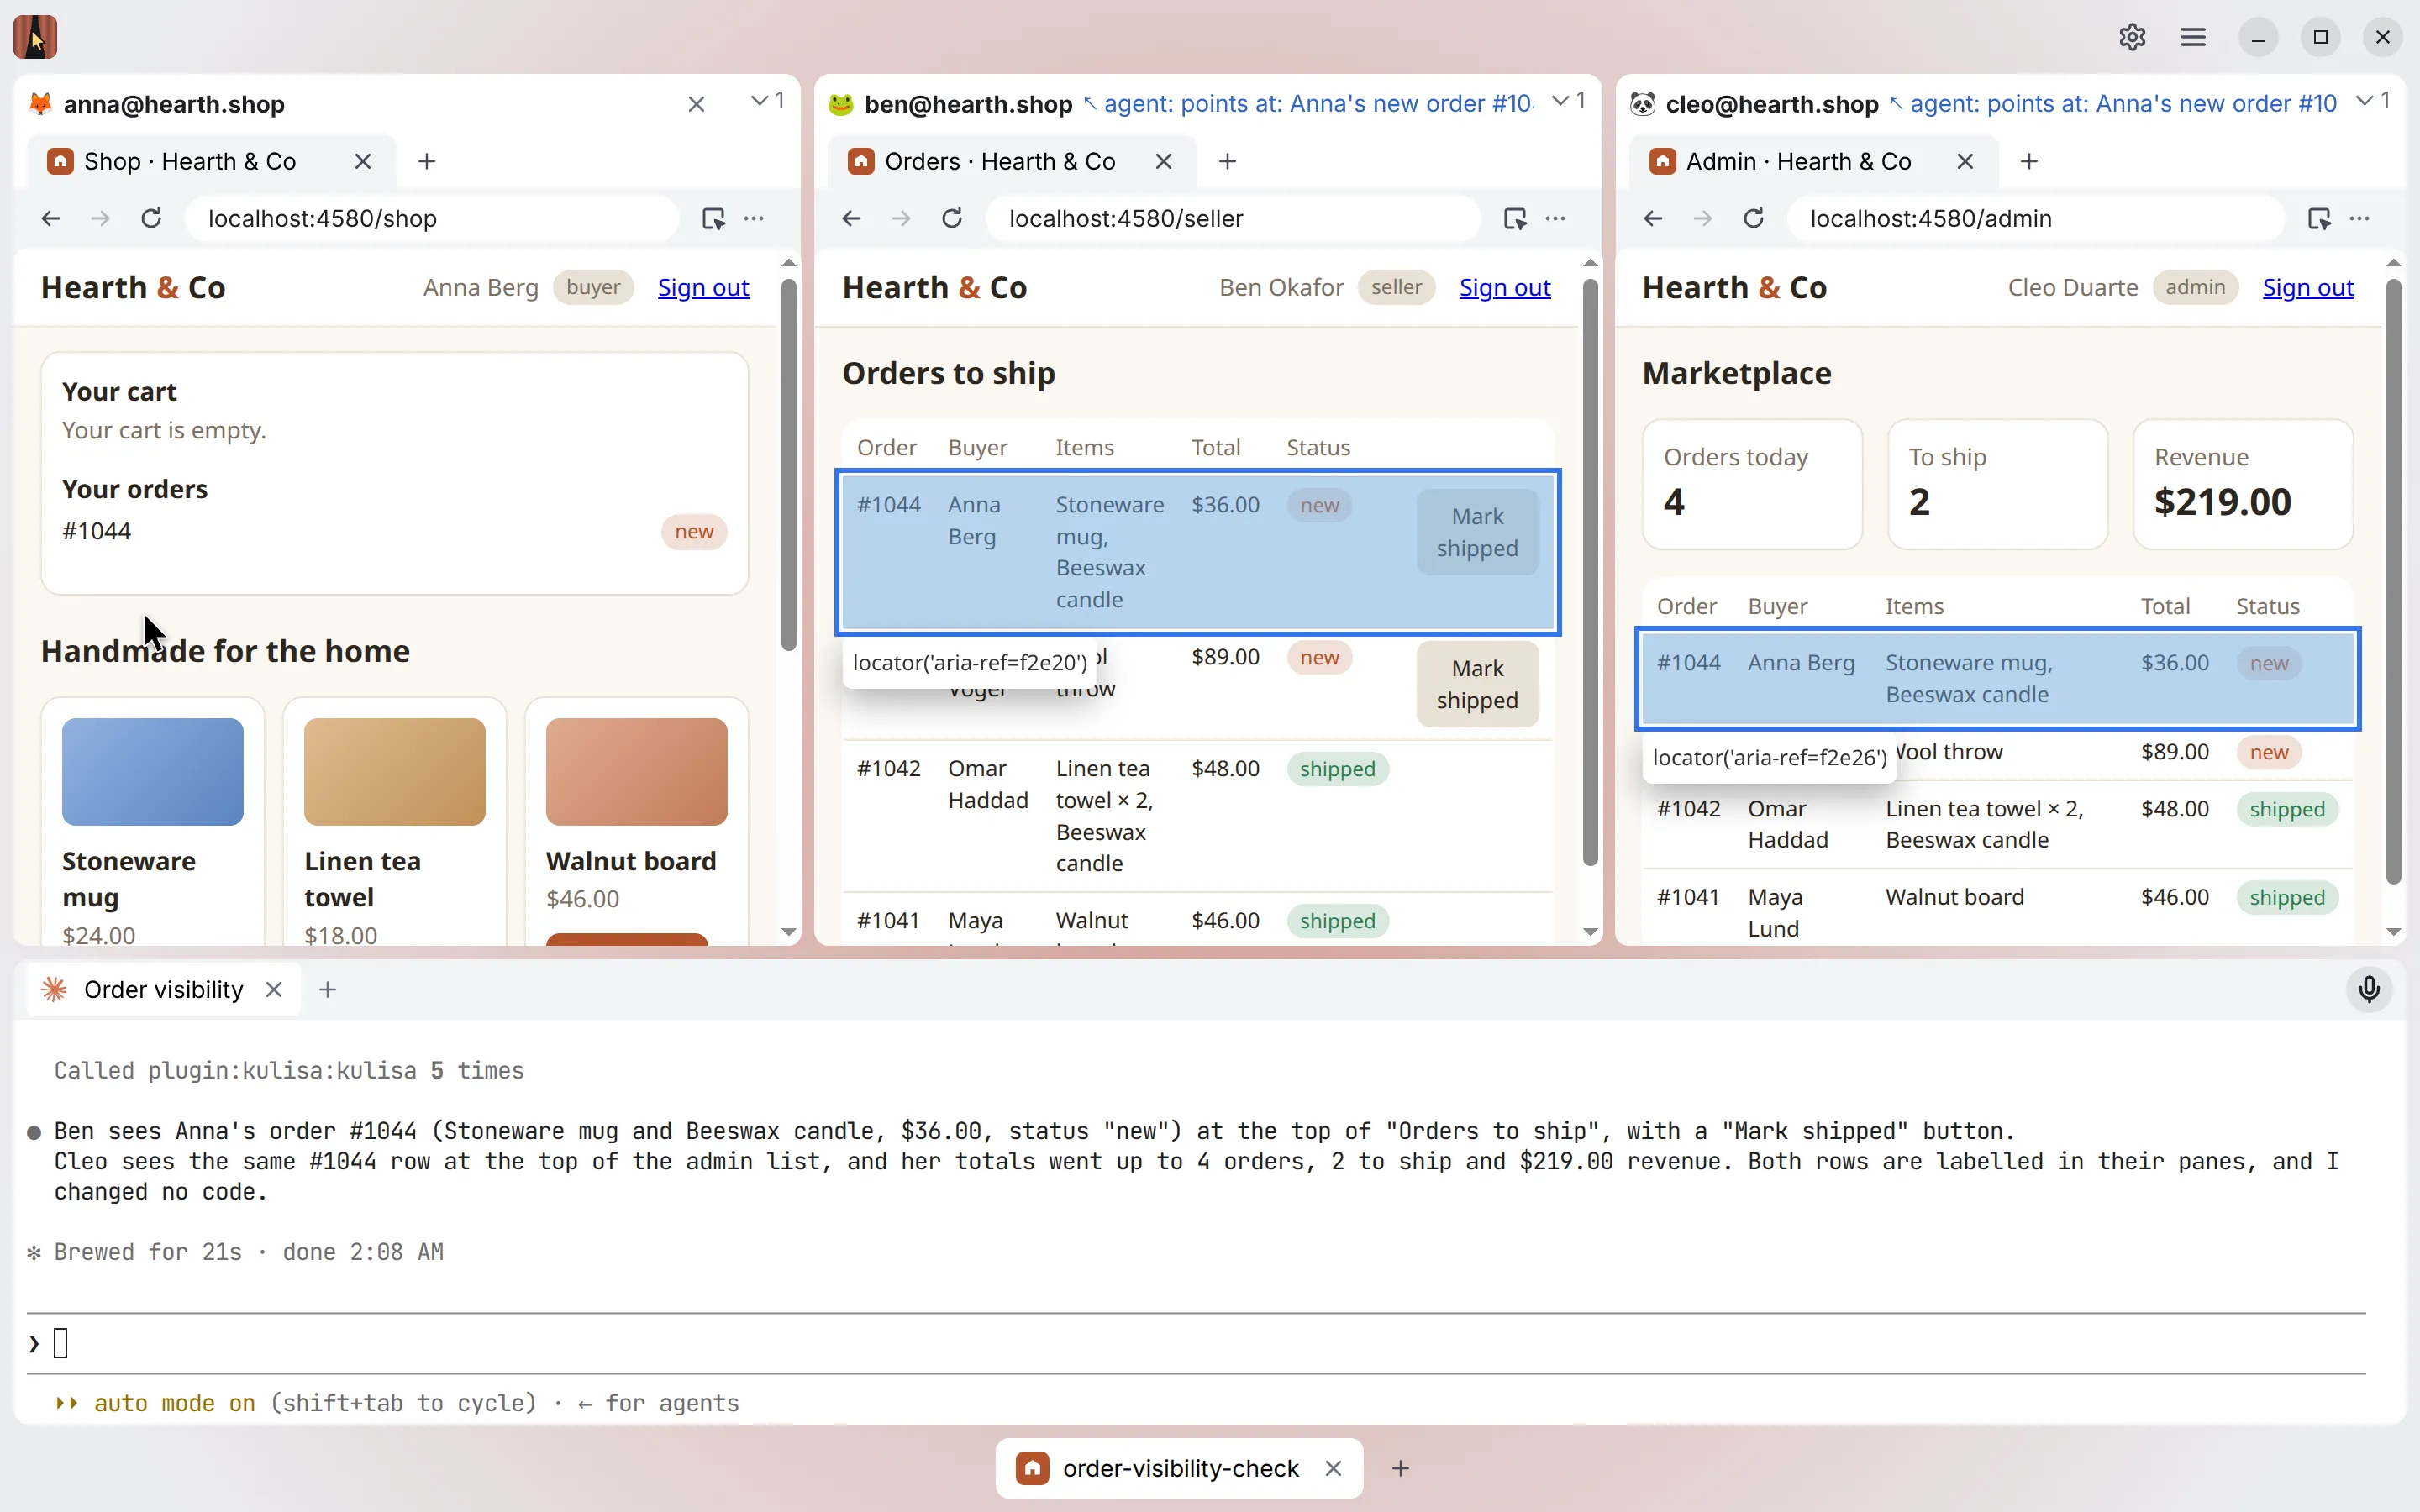
Kulisa is a desktop app where the AI agent you choose (Claude Code, Codex) works in your signed-in browser profiles, side by side. It builds, checks the result as every user of your app, fixes, and goes again until it works, while you watch every step or take a break. It is made first for developing web apps with several users at once (a buyer, a seller, an admin), and is good for any work in web apps: several clients’ accounts, admin and support work.
You sign in to your accounts yourself, by hand; the agent never does, except as test users of your own app on this computer. Everything stays on your computer.
Words used here
- Profile: one browser identity, as in Chrome: its own cookies, sign-ins and tabs. One profile is one user of your app (“ann, the seller”). It is shown as a pane with its tabs.
- Project: what you work on: its code (a folder, or one or more git repositories), the agents that work in it, and its profiles. A project is not opened or closed itself; its tasks are.
- Task: one piece of work in a project: an agent in a terminal, its own copy of the code, the project’s profiles, and a grid of panes. Several tasks of one project run at once, each building something else.
- Tab: an open task in the tasks’ bar (under the grid, or in the title bar), as a browser’s tab; its project’s icon is on it.
Systems
Kulisa is made for Linux, Windows and macOS. Its installers are for 64-bit Intel and AMD processors (x64), not yet for ARM ones.
- Linux: Ubuntu, Debian and Fedora, in the versions their makers still support. Kulisa is made on Ubuntu, and tested there the most.
- Windows: Windows 10 and later. Newer there, and less tried.
- macOS: Ventura (13) and later. Tested by its developers, run from its code; no installer yet.
Not as an AppImage, Snap or Flatpak, on purpose: on recent Ubuntu an AppImage runs only with the browser’s protection of your signed-in pages turned off, and Snap and Flatpak would keep Kulisa from your terminal, git and agents, which it works with.
Getting started
Download Kulisa from its latest release:
- Windows:
Kulisa-<version>.Setup.exe. It is not signed yet, so Windows warns about it: More info → Run anyway. It installs for you alone, with no questions, and starts. From then on it updates itself: a new version is downloaded in the background; Kulisa offers to restart into it, or it starts the next time you start Kulisa. - Linux: the
.debfor Ubuntu and Debian (sudo apt install ./kulisa_<version>_amd64.deb), the.rpmfor Fedora. Kulisa is then in your apps. On Ubuntu and Debian it then updates with the system: a new version comes in Software Updater, or withsudo apt update && sudo apt upgrade; installed while Kulisa is open, it offers to restart (everything comes back as it was), or starts next time. The.rpmdoes not update itself: install a new version the same way. - macOS: to come.
Every installer is built by GitHub from Kulisa’s published code, and GitHub keeps a signed record of it. To check a
file you downloaded, with GitHub’s command-line tool: gh attestation verify <file> -R cosmotools/kulisa.
- Make a project. At the first start Kulisa shows in three short slides what it does (Skip passes them), then New Project, in three steps (below): its code, its agents, the users of your app. Create makes it and opens its first task.
- Tell the agent what to do in the terminal. It opens the profiles it needs itself.
- Sign in where your app needs a real account: when the agent asks, or ahead of time with Sign In… in Settings → Profiles. You sign in once, for every task.
More tasks: + in the tasks’ bar makes a new one in one click (with several projects, it asks which one first). Tasks of another project, and those you closed, are in the sidebar (Tasks, below).
The window
- The title bar: the Kulisa logo in the shown project’s color (not on a Mac, where Kulisa’s icon is in the Dock), the tasks’ bar if you put it there, Settings (the gear; not at the very first start, while there is nothing to set yet), and ☰, the window’s menu: zoom, theme, where the tasks’ bar is, language, Arrange panels, Keyboard Shortcuts, links, About Kulisa, Exit. On a Mac there is no Exit: ⌘Q quits Kulisa, and closing the last window only hides it, while your agents go on working; click Kulisa’s icon in the Dock to bring it back.
- Settings (on a Mac also ⌘, or Kulisa → Settings… in the menu bar) fills the window, over your task, and shows that task’s project: set what you need and close it (Esc, the ← arrow at its top left, or the gear again; what you typed is saved as you go). Your task goes on meanwhile, and is there as you left it.
- The grid: the shown task’s panes (one per open profile) and its terminals, flat side by side, split by thin lines. Drag a pane by its header to move it, onto another pane to stack them as tabs; drag the line between two to resize them. ☰ → Arrange panels offers ready-made arrangements. Each task keeps its own grid.
- Resources, next to the terminal (beside it, or under it when the terminal is on the right): what the task works in (its copy of the code, or your project’s folder until it has one), a click opens its folder; and under Artifacts, what you and the agent kept of the pages: screenshots (with a small picture), snapshots of a page, the bodies of requests, the newest first, with whose page and when. A click opens one; a right-click offers Open, Show in Folder, Send to Agent and Delete. Drag one into the agent’s input to add its path; sending or dropping it leaves the prompt for you to finish. The heading says how much room they take; its 🗑 deletes them all. The agent sees the same: ask it what is there, or to clean them up. Past 100 MB a task’s oldest go by themselves. Drag the line beside it to resize it, as any pane.
- The tasks’ bar, under the grid (or in the title bar, as a browser’s tabs: ☰ → Tasks bar): first the sidebar’s button (every project with its tasks: Tasks, below), then a tab per open task, of any project, with its project’s icon and its agent’s state, the shown one filled; + after them makes a new task, asking which project when there are several. When there are more tabs than fit, the mouse wheel over the bar scrolls them, and a faded edge shows that more are past it.
- No task open (after you close the last task): the sidebar stays open at the window’s left, every project with its tasks (Tasks, below). At the very first start, with no project yet, it shows what Kulisa does, then New Project.
Projects
New Project
At the first start, with no project yet, the window is New Project after three slides of what Kulisa does (Back on the first step shows them again); later, New Project… at the foot of the sidebar. Three steps; Next goes on, Back goes back with what you typed kept, and nothing is made before Create.
1. Code. Where its code comes from, in the tabs at the top:
- New folder: a new, empty project. Kulisa makes the folder (in the KulisaProjects folder in your home folder unless you choose another place), a plain folder: tasks work right in it. Want git? Ask the agent to set it up; the tasks you make after that each get a copy of their own.
- Folders on disk: code you already have, one folder or several (a frontend and a backend). Nothing in them is changed.
- Clone from URL: one repository or several, cloned with your own git (its keys and credentials).
At the very first start it takes one folder or one repository; add the others (a frontend and a backend) later, in Settings. There the project is named after its folder or repository (the line under it says so; rename it in Settings); only a new folder asks for a name.
The step says what will happen as you type. Its color and icon are not asked: Kulisa finds its site’s favicon in its code and takes the color from it, so a red logo makes a red project. A project whose code has no favicon gets the curtain and a color of its own.
2. Agents. Who works in its tasks: tick your agents’ accounts, one or several; ★ marks the one a new task starts (the first you ticked, unless you star another). Add account → Claude Code or Codex signs in to a new one in your browser; an agent not on your computer yet is installed first, by itself (Details shows the installer at work). Tick none and its tasks start with a terminal, where you run what you like.
3. Profiles. The users of your app: Add Profile, a name (ann@shop.com) and who it is (“seller; can approve
refunds”): the agent chooses profiles by it. Tick any of your other profiles to have them here too. None now is fine:
the agent makes those it needs.
Create makes the project and opens its first task, its agent in the terminal. All of it can be changed later on its page in Settings.
A project’s page
Settings (the gear) → Projects → the project, or Project Settings… in a project’s right-click menu in the sidebar, or in a task tab’s right-click menu, under the project’s name. Everything is saved as you change it; there is no Save button.
- Name.
- Local addresses: addresses of your app besides
localhost(a tunnel, a dev domain), where the agent may type a test user’s password (Profiles, below). Type one and press Enter; its × removes it. - Folders: its repositories or plain folders, all alike, with git or without. Add Folder adds one (Add Folder…, Clone from URL…, which clones next to the default folder). A folder’s ⋯ (or a right-click on it): Remove from the Project (its folder stays), Make Default: a new task gets a copy of it, and the agent starts there; a task adds the others when it needs them (Tasks, below). Each repository on GitHub shows the GitHub account it goes as (GitHub, below): Kulisa picks the first of yours that can reach it, and you can choose another there. A line under the list says when none can, and why.
- Agents: the accounts its tasks run. Make Default in one’s ⋯ makes it the one a new task runs; No Default on the default one leaves the project with none: a new task then starts with nothing running, and big buttons in the middle let you open the agent you want, or a terminal. With no agents at all, a new task starts with a terminal.
- Profiles: which profiles its tasks have. Add Profile makes a new one or adds one you have; Remove from the Project… in one’s ⋯ lets go of it (the profile stays in Settings → Profiles).
- ⋯ → Delete Project… deletes Kulisa’s data of the project and all its tasks, after a question saying what goes. Its own folder and your code stay.
Agents and their accounts
Settings → Agents lists the agents Kulisa knows (Claude Code, Codex): installed or not. Click one to see its version, its accounts, and Install if it is not installed. Kulisa never removes or updates an agent: its maker’s installer updates it.
An account is an agent signed in to one of your subscriptions, so a work and a personal one can run side by side. Make one with New Account on the Agents page (then the agent), Add Account on the agent’s page, or on a project’s page. Each account starts clean: your own settings of the agent outside Kulisa are not used. It is shown by its email, and stays until you delete it here (its ⋯ → Delete…).
A task may have several agents at once, each in a tab of its own (Terminals, below): Claude Code next to Codex, two of your accounts, or one agent twice. Each starts a new conversation and names its tab in a few words once it knows what it works on. To pass the work on (when one runs out of its limit, or for a fresh start), click the agent’s icon on its tab (or Change agent… in its right-click menu). Change Agent shows what goes along to the next one: the task’s branch, its profiles still signed in, their tabs, the terminals running, the whole conversation; and what stays behind. Choose the agent and Hand over: it reads what was said and done in that conversation while a bar shows how far it has read, then its tab opens and it tells you in a few lines where it stands. If it needs you first (a permission, a sign-in), its tab opens at once; Show now does not wait. The old tab stays until you close it. Or simply tell an agent “go on with what Claude did”: every agent of the task can read the others’ conversations.
Dictation: hold the right Ctrl key (the right ⌘ on a Mac) while you speak, wherever you are in Kulisa, a page or the terminal, and let go; or press it once to start and once more to stop. The text goes into the agent’s input for you to read and send. It hears the language chosen in ☰ → Language. The microphone at the end of the terminals’ row shows that it is listening, and works the same way by the mouse: hold it, or click to start and again to stop. While you speak, a capsule at the top of the terminal shows your voice as a wave and how long you have spoken; when you let go it says it is transcribing, then that the text is in the agent’s input. Claude Code listens itself; for Codex and any other agent without dictation of its own, Kulisa listens with Claude Code behind the scenes, so you need it installed and signed in with a Claude subscription (Settings → Agents); the words appear as you speak and are put right when you let go. The first time after a break, the capsule says Getting ready… for about a second (the microphone turns blue): speak once it shows the wave. With a terminal in front, the key brings the agent back in front. Greyed out, its tooltip says why. Another key instead of the right Ctrl: ☰ → Keyboard Shortcuts, Change on its row, then press the key.
GitHub
Settings → GitHub holds your GitHub accounts, as many as you have (work, personal). Kulisa keeps their sign-ins itself, encrypted with your computer’s keyring; your agents never see them. Add Account adds one, two ways:
- With GitHub…: Kulisa shows a code and opens GitHub’s page in your browser; enter the code there and allow Kulisa App. Then install Kulisa App on the accounts or organizations whose repositories you work on (github.com/apps/kulisa-app): it reaches only those, and only what it asks for (reading code, pull requests and issues, checks). Enter a code on GitHub only when Kulisa has just shown it to you: a code someone else gives you would sign them in as you.
- With a Token…, for an organization that does not install Kulisa App: make a fine-grained personal access token on GitHub (the link there fills in the permissions Kulisa needs), choose the organization as its resource owner and its repositories, and paste it. A classic token is refused: it reaches all of your repositories.
In an organization you are a member of, only its owner can install Kulisa App: GitHub lets you request it, and the owner decides. Ask them to install Kulisa App on the repositories you work on; or, if they will not, make a fine-grained token for the organization, which its owner may also have to approve (and, where the organization signs in through its company’s single sign-on, authorize for it). A repository no account can reach says so on its row in the project, with a link to install Kulisa App.
The list shows each account, where Kulisa App is installed, the projects using it and until when it is signed in. A sign-in with GitHub lasts six months from the last time Kulisa used it; a token, until it ends. When one ends, or GitHub turns it down, the account says Signed out: Sign in Again… in its ⋯ or right-click menu. On a Linux computer without a keyring, Kulisa cannot keep a sign-in safely, so it keeps none: you sign in again after Kulisa restarts, and the page says so. Delete… (its ⋯) deletes an account after a question; Kulisa forgets its sign-in, which GitHub still knows until it ends: the question links the GitHub page where you revoke it at once.
Tasks
- The sidebar (the button at the start of the tasks’ bar, or Ctrl+Shift+A; with no task open it is always there): every project with its tasks, the one you worked in last first. Open tasks come first, showing what their agent is doing (or “open” when they are in another window), then the closed ones, with when you closed them, and “merged” once their work is merged. Click a task (or Enter) to switch to it or open it again; its trash can (or the Delete key) deletes it. + on a project’s row, shown under the pointer, starts a new task of it; a right-click on the project has New Task, Project Settings…, Show Data Folder, Delete Merged Tasks… and Close All Tasks. New Project… is at its foot. Over a task, it closes once you choose something (or with Esc).
- A new task: + in the tasks’ bar (with several projects it asks which one), Ctrl+Shift+N for the shown task’s project, or + on a project’s row in the sidebar. It runs the project’s default agent with a new conversation; describe the task to it. With no default agent, you choose one with the buttons in the middle (Ctrl+` puts the keyboard on them). Its profiles are all closed: the agent opens those it needs, or you do: while none is open, each has a button over the terminal (click it), and the task’s tab lists them on a right-click. A project with no profiles has one button there, Add Profile….
- Its own copy of the code. In a project with git, every task works in a copy of its own (a git worktree) on a
branch of its own, next to your project’s folder (
myshop@task-2). Your project’s folder stays yours: the agent merges its work into it only when you ask (and checks first that you have no unsaved changes there), or opens a pull request. Files git ignores, such as.env, are copied into the task’s copy too. Without git, tasks work right in the project’s folder; such a task still adds the project’s repositories (below), each copy on a branch of its own. - Several repositories. In a project of several repositories (a frontend and a backend), a new task gets a copy of the default one only. When the work needs another, add it: right-click the task’s tab and choose it under Add Repository. The agent may ask you for one too, and adds it once you agree; to only read another repository it needs no copy. The repositories the task has are listed in Resources, next to the terminal. Kulisa gives the agent the new folder itself (Claude Code at once, unless it is waiting for your answer; other agents once they have finished what they are doing). One you no longer need goes the same way: Remove Repository on the task’s tab, or the trash can on its row in Resources (the agent may ask to remove one too). Its copy and branch are deleted; when they hold work not pushed, Kulisa asks you first.
- Its own ports. Each task runs your app on its own ports, the usual ones plus 100, 200, …, so several tasks run the app at once. Its profiles’ tabs on local addresses already point there, and stay signed in.
- Its name is
task-1,task-2… until the agent names it, by itself and without a word about it, once your message says what the task is about, or you do (Rename… in its tab’s right-click menu, or a double click on its tab). The branch takes the name too. Until it has a name, holding the pointer over its tab (or its row among the closed tasks) shows your first message in it. - Its state on its tab: working (a spinner), waiting for you (an exclamation mark: a question, a permission, a limit), done (a check, until you look at the task).
- Switch by clicking a tab, of any project. The other tasks keep running: their agents and pages go on.
- × closes a task (or the middle button on its tab, or Close in its menu): its agent stops and its tabs close; its code, branch, profiles and conversation stay. Open it again from the sidebar: the agent continues the conversation.
- Delete Task… (its tab’s right-click menu) deletes it for good: its copy of the code, its branch, its profiles’ copies, its conversation. The question says what would be lost (work not merged and not pushed). A task is deleted from its row in the sidebar too: the trash can at the row’s end (or the Delete key), open or closed. Once a closed task’s work is merged, its row says “merged”, and the project’s menus offer Delete Merged Tasks….
- The project’s submenu, at the end of a tab’s right-click menu under the project’s name: New Task, Move All Tasks to New Window or to another window, Project Settings…, Show Data Folder, Delete Merged Tasks…, Close All Tasks (asks only when an agent is working).
Several windows
- Move to New Window in a tab’s right-click menu, or drag the tab out of the window, e.g. to a second monitor. Its agent and pages move along, still running. Move to Window: … puts it into another window; dragging a tab within the bar changes the order.
- Move All Tasks to … in the project’s submenu moves every open task of that project in this window together.
- Closing Kulisa keeps everything: the windows and their tasks come back at the next start.
Profiles
Settings → Profiles is the one place for who a profile is: the same person in every project and task. Click a profile there to see its page.
- New Profile there makes one: type its name, Enter (or Add Profile → New Profile… on a project’s page, to make it in that project).
- Name: letters, digits and
@ . _ + -, so it can be the account’s email (ann+test@shop.com). The agent calls the profile by it, so two profiles of one project cannot have the same name (Annandannare the same). - About: who it is in your app and what it can do. The agent picks profiles by it; if it is empty, the agent asks you and saves your answer.
- Picture: an animal, to tell the panes apart at a glance.
- ⋯ → Delete Profile… (or right-click the profile) removes it everywhere, with its sign-ins, for good.
Signing in
- You sign in once, for every task. Each profile has a master copy: Sign In… in Settings → Profiles, or Sign In to Master… in its pane’s menu (⋯ on its header, or a right-click there), opens it in a window of its own. Sign in there; every task gets that sign-in. A sign-in, or a sign-out, of a real account in any task reaches the others too.
- Signing in to your app on
localhoststays in that task: each task runs its own copy of your app. - Test users of your app: a profile’s Test login and Test password (Settings → Profiles), or saved by the agent after it signs a user up. The agent then signs in as that user itself; Kulisa types the password, the agent never sees it, and only on your local app, never on a real site or an account provider (Google, Microsoft …).
- While a pane is on a sign-in page (Microsoft, Google, Okta …), the agent is kept out of that profile until you are through.
Open, close, remove
- × on a pane closes the profile: its tabs go and free their memory; it stays signed in. Open it again from the task tab’s right-click menu, with the same tabs.
- Remove from Project… (the pane’s menu) takes the profile out of this project; it stays in Settings → Profiles.
A profile’s pane
A pane is a small Chrome. Its header shows the profile’s picture and name, what the agent is doing in it, ⋯ (the profile’s menu, also on a right-click) and ×. Under it, a tab strip, then back, forward, reload, the address bar, Pick and ⋮.
-
A new tab is empty, in Kulisa’s colors, with the keyboard in the address bar: type an address, or words to search Google for.
-
target=_blanklinks and pop-ups open as tabs of the same profile. Right-click a tab: Reload, Duplicate, Close tab, Close other tabs. -
In a narrow pane, back, forward and then reload move into the pane’s ⋮ menu, so Pick and ⋮ stay in reach; their keys work as always (Alt+←, Alt+→, Ctrl+R).
-
Chrome’s keys work in a page: Ctrl+T, Ctrl+W, Ctrl+Shift+T, Ctrl+L, Ctrl+Tab, Ctrl+1…9 (Keyboard shortcuts, below).
-
Zoom a site with Ctrl + / − / 0 in its page; it is kept for that site in that profile and shown in the address bar (a click resets it).
-
Right-click in a page for Chrome’s menu: open a link in a new tab of the same profile or copy its address, copy or open an image, cut, copy and paste in a field, back, forward and reload; Pick an element for the agent, a screenshot of an element, and Inspect. Sites with a menu of their own (Teams, Google Docs) show theirs.
-
DevTools of a tab: the pane’s ⋮ menu, or F12.
-
Screenshots of a tab: the pane’s ⋮ menu → Screenshot:
- Element: click an element on the page (or press Ctrl+Shift+S in the page); Esc cancels;
- Visible Part: what the pane shows;
- Full Page: the whole page down to its end. A page that scrolls inside a box of its own (many mail and admin apps) gives what is visible; take that box as an element instead. Pictures further down may still be empty if the page loads them only when you scroll there.
The picture goes to the clipboard (paste it into a message, or into the agent’s input with Paste) and to the task’s Artifacts in Resources, as screenshots the agent takes do. The agent’s marks are not in it. Delete it there or from its thumbnail; deleting the task removes it too. Past 100 MB the task’s oldest artifacts go by themselves. To keep a picture outside the task, drag its thumbnail into a folder.
A screenshot taken by you or the agent shows a thumbnail in the pane’s corner for a few seconds, as on a Mac; it stays while the pointer is over it. Click it to open the picture; drag it into a message, a mail or a folder; right-click it for Show in Folder, Copy, Send to Agent (the picture into the agent’s input), Delete and Close. The × in its corner, shown while the pointer is over it, closes it at once.
-
A page’s alert or confirm shows in its pane, as in Chrome. A page that does not load says why, as Chrome’s error page does.
-
Pages no one looks at are unloaded after five minutes, as Chrome’s Memory Saver does, to give the memory back: a tab behind the active one, a pane behind another, the tabs of a task you are not looking at, once its agent has stopped working in them. The tab stays in its strip as it was and loads again when you click it or come back to the task; the agent gets it back the same way. A page with unsaved changes stays, as in Chrome.
Working with the agent
- Your typing stays where you put it. A tab the agent opens, or a page that loads by itself, does not take your keyboard: what you type to the agent in the terminal stays there. A click in a page gives it the keyboard, as always.
- You see what it does. Each of its actions is marked in the page (where it clicks, the element outlined, its own pointer), and a caption over the pane says what it is doing.
- Point and tell. Click Pick (the arrow icon at the end of the address bar, or Ctrl+Shift+C), then an element on the page. A reference to it goes into the agent’s input; write the rest of the message around it (“this button does nothing”) and send. Picks from several panes can go into one message. Esc cancels.
- It points back. Asked where something is, the agent outlines it in the page, with a label over the pane, until you click or type there.
- Several users at once: the agent acts as one profile and checks the effect as another (“Sam sends an invite, Ann receives it”).
- Its own terminals. What keeps running (your app’s dev server,
docker compose up) the agent starts in a terminal of its own, a tab behind the one you look at, so you see it, stop it and type into it.
Terminals
- A task’s terminals are tabs of one panel, one shown at a time, the tabs in a row over it. Each is your own shell in the task’s folder, an agent started in it or not, as if you had typed it: your project’s environment applies. Its tab shows the agent’s icon, its name and what it is doing (working, waiting for you, done).
- + at the row’s end opens one of the project’s agents, a new conversation, or Terminal, a shell. Closing an
agent’s tab (×) asks first; its conversation stays in the task’s history. A shell closes at once, or with
exit. - Close the last one and the panel folds to a thin strip with + in its middle, which opens one again (Ctrl+` opens the task’s agent). With no profile open either, big buttons in the middle of the window do what + does: one for each of the project’s agents, then Terminal. Tab moves between them and Enter opens one. Under them, a button for each of the project’s profiles opens it.
- Terminals come back after a restart in their tabs: an agent continues its conversation, a shell starts fresh. An agent’s tab shows “Starting…” for a moment while its agent starts.
- Copy and paste as in your OS’s terminal: Ctrl+Shift+C / Ctrl+Shift+V on Linux, Ctrl+C / Ctrl+V on Windows, ⌘C / ⌘V on macOS. Paste also attaches clipboard images in Claude Code and Codex, including from the right-click menu.
- Drop files onto a terminal to put their paths into your message, quoted where needed and separated by spaces. This also works for an image saved on your computer. Press Enter when your message is ready.
- Ctrl+click a link to open it: Kulisa asks where, in one of the task’s profiles or in your own browser.
- A file or folder named in the terminal (a screenshot the agent saved, a file it changed) is a link too: Ctrl+click it to open it in its app or show it in its folder. A program or script is only shown in its folder, never run.
- Right-click: Copy, Paste, Select all, Clear; in an agent’s, Change agent… (the same as its icon) and New Conversation (the same agent, from nothing); Close.
Look and zoom
- ☰ → Theme: Dark, Light, or System (as your OS), chosen in a menu beside its row, as Tasks bar and Language are. Profiles’ pages keep your OS’s theme, so your app looks as its users see it.
- ☰ → Language: the language you speak with the agents, one for all of them. Claude Code takes your speech in it and answers in it, and may write code comments in it too: say in your project’s CLAUDE.md which language its code is written in. Codex has no language setting yet, so it is not changed.
- Kulisa’s zoom: Ctrl + / − / 0 outside the pages, or the zoom row in ☰, from 50% to 200%. It scales all of Kulisa, pages included; when not 100%, the title bar shows it (a click resets it).
Keyboard shortcuts
☰ → Keyboard Shortcuts (Ctrl+Shift+/) lists them all. On macOS they are ⌘’s. The main ones:
| Keys | What |
|---|---|
| Ctrl+` | The terminal in front, and back to the page |
| Ctrl+Shift+` | A new terminal |
| Ctrl+Shift+A | The sidebar: every project with its tasks |
| Ctrl+Shift+N | New task of the same project |
| Ctrl+Shift+1…9 | The first to ninth tab |
| Ctrl+Shift+PgDn / PgUp | The next or previous task |
| Ctrl+Shift+C (in a page) | Pick an element for the agent |
| Ctrl+Shift+S (in a page) | Screenshot of an element |
| Ctrl+T, Ctrl+W, Ctrl+Shift+T (in a page) | New tab, close the tab, open the tab closed last |
| Ctrl+L (in a page) | The address bar |
In the terminal every other key is the agent’s.
Where Kulisa keeps things
☰ → About Kulisa (on a Mac also Kulisa → About Kulisa in the menu bar) opens Settings at its About page: Kulisa’s version and the exact folders on your computer: the data folder, the projects’ folder and the program’s, each with a button that opens it in your file manager, its path there to copy. Look there rather than guess: where the folders are depends on your OS and its settings. Usually:
- Your projects’ folders hold only your code: Kulisa writes nothing there.
- Tasks’ copies of the code are next to the project’s folder (
myshop@fix-header, after the task’s branch), or in the KulisaProjects folder in your home folder (C:\Users\<you>\KulisaProjectson Windows,/Users/<you>/KulisaProjectson macOS,/home/<you>/KulisaProjectson Linux) for a project of several repositories, as<project>@<branch>. They go when the task is deleted. New projects’ folders are made there too. - Profiles, sign-ins, accounts and settings are in Kulisa’s data folder:
~/.config/Kulisaon Linux (or under$XDG_CONFIG_HOMEwhen that is set),~/Library/Application Support/Kulisaon macOS,%APPDATA%\Kulisaon Windows. Session cookies, test passwords and GitHub sign-ins are encrypted with your OS’s keyring. Show Data Folder in a project’s right-click menu in the sidebar, or in a task tab’s under the project’s name, opens that project’s. - Deleting a task, a profile or a project removes what Kulisa made for it.
- Screenshots you or the agent take belong to the task: its artifacts in Resources. Deleting the task removes them.
- Kulisa keeps a log of what it did (the buttons and tools used, tasks opened and closed, errors), never what you
typed or your passwords: the
logsfolder in the data folder, two files of 1 MB at most. Read it in Settings → Log (below, Reporting a problem).
Reporting a problem
When something goes wrong, ☰ → Report a Problem… opens Settings at its Log page: what Kulisa did, line by line, as it happens (Follow keeps the end in view). Scroll up to read older entries; turn Follow on to return to the latest. Searching covers the whole log. Errors shows the warnings and errors alone; Agent, Human and Tasks what the agent did, what you did, and tasks and windows opened and closed; the field beside them narrows it further (a task’s name, a word). The log holds your project and task folders, profile names and the pages’ addresses without their queries; never what you typed, passwords, tokens or cookies. Then pass it on any way you like:
- Report… → On GitHub… opens a new issue in your browser with your Kulisa’s version and OS filled in; attach the log to it (Save As… first). The issue is public: look through the log before attaching it.
- Save As… saves the log as a file to attach to a message or a chat; Copy All copies it; Open Folder shows the file in your file manager.
Reinstalling and removing Kulisa
Uninstalling Kulisa (your OS’s way: Apps on Windows, apt remove kulisa or dnf remove kulisa on Linux, the Trash
on macOS) removes the program only (on Ubuntu and Debian, apt purge kulisa also removes where its updates come
from). Everything you made stays where it is listed above, so installing Kulisa again
brings it all back: your projects, tasks, profiles with their sign-ins, agents’ accounts and settings.
To remove everything, do it before uninstalling, in Kulisa, so that it cleans up after itself. First note the folders in ☰ → About Kulisa (Settings → About): once the program is gone, nothing shows them. Then delete every project (⋯ → Delete Project… on its page: its tasks go with it, with their copies of the code and their branches), every profile (Settings → Profiles) and every agent’s account (Settings → Agents: the account’s ⋯ → Delete…, which signs it out). Then uninstall the program and delete the data folder (above). What remains and is yours to keep or remove:
- Agents Kulisa installed for you (Claude Code, Codex): programs of your own, updated by their makers. Settings → Agents shows where each one is; remove them their way.
- A project’s repository that Kulisa cloned for you: your code.
- Kulisa’s key in your OS’s keyring, “kulisa Safe Storage”: on Windows nothing to remove; on macOS in Keychain Access; on Linux in your keyring app (Passwords and Keys). On Linux and macOS also direnv’s permissions for tasks’ folders, if you use direnv.
If you uninstall first, the tasks’ copies of the code stay next to your repositories, each still a worktree and a
branch of its repository: in a terminal, in the repository, git worktree prune and git branch -D <branch>
remove them (the same on every OS).